
If you’ve got a leaning or failing fence post, you’ve probably realized something quickly: there are way too many ways to fix it. Some are quick and cheap. Others are permanent but a lot more work. And a few… honestly just waste your time.
After dealing with everything from slightly loose posts to full-blown rot situations, here’s the truth:
There is no single “best” repair method—only the best method for your situation.
Let’s break down each option so you can make the right call the first time.
Step 1: Diagnose Before You Fix
Before choosing a method, figure out what you’re dealing with:
- Leaning but solid post → soil issue
- Rot at base → structural failure starting
- Severely rotted or broken → full replacement needed
👉 See: Why Fence Posts Rot (And How to Prevent It)
https://www.fencepostfix.com/why-fence-posts-rot/
This step matters more than the repair itself. Fix the wrong problem, and you’ll be doing this again in a year.
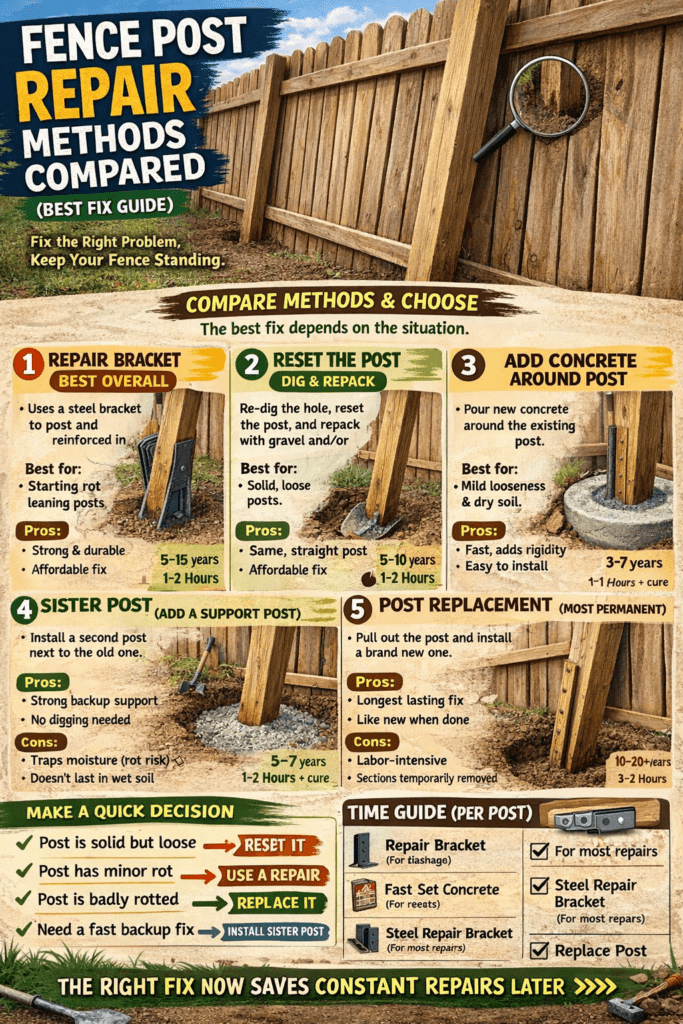
Fence Post Repair Methods (Compared)
1. Reinforce with a Post Repair Bracket (Best Overall)
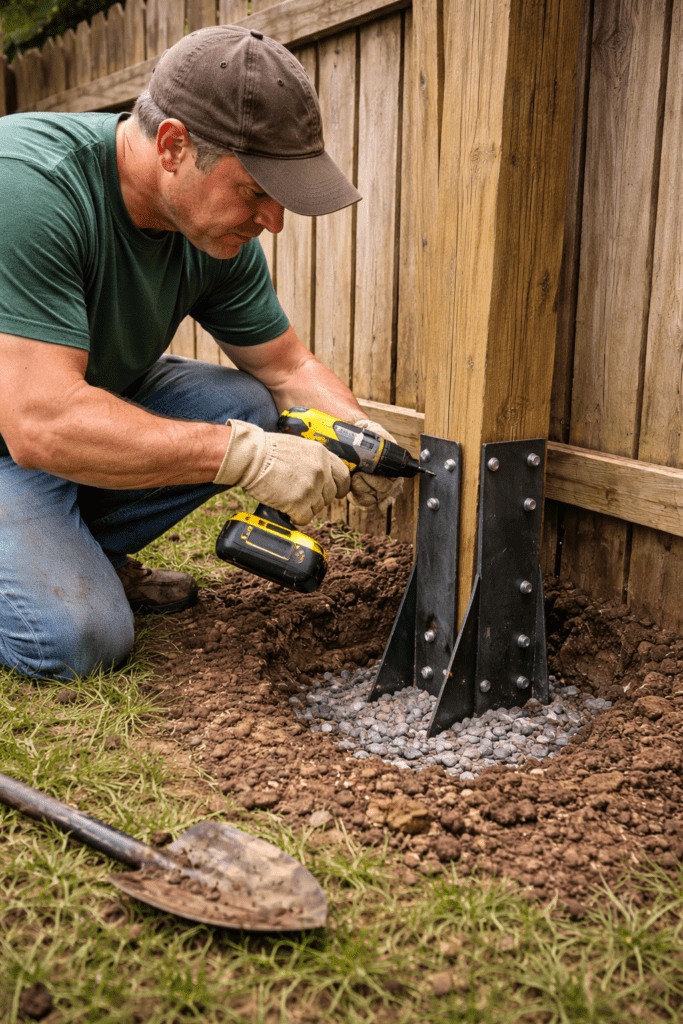
This is my go-to in most situations.
Best for:
- Rot starting at the base
- Posts that are leaning but still mostly intact
- Fast, long-lasting repair
How it works:
Steel brackets or stakes are driven into the ground and attached to the post, stabilizing it without removing it.
👉 See: Best Fence Post Repair Kits (Budget to Pro)
Time to complete: 1–2 hours
Pros:
- No digging required
- Strong and durable
- Works even with partial rot
Cons:
- Visible hardware
- Slight upfront cost
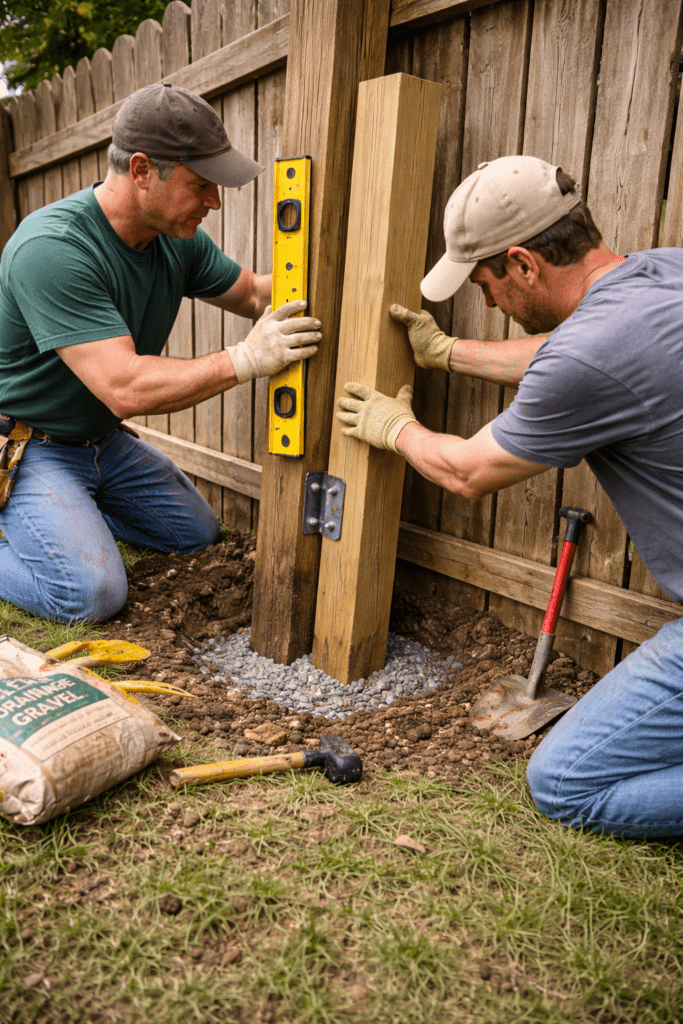
2. Reset the Post (Dig and Repack)
This is the best fix when the post is still structurally sound.
Best for:
- Loose or leaning posts
- Soil shifting issues
- No significant rot
How it works:
You loosen the base, straighten the post, and rebuild the foundation with gravel and/or concrete.
👉 See: How to Reset a Fence Post Without Replacing It
Time to complete: 1–2 hours
Pros:
- Affordable
- Restores original alignment
- Good lifespan if done right
Cons:
- Labor involved
- Won’t fix rot
- Can fail if drainage isn’t addressed
3. Add Concrete Around the Existing Post
This is a common DIY fix—but it’s often misunderstood.
Best for:
- Mildly loose posts
- Situations where digging is limited
Time to complete: 1–2 hours + curing
Pros:
- Adds rigidity quickly
- Easy to execute
Cons:
- Can trap moisture → future rot
- Not a long-term solution in wet soil
4. Sister Post (Add a Support Post)
This method doesn’t get talked about enough—but it works.
Best for:
- Weak or partially rotted posts
- Quick structural reinforcement
How it works:
Install a second post next to the original and attach them together.
Time to complete: 1–2 hours
Pros:
- Strong support
- No need to remove original post
Cons:
- Bulkier look
- Not ideal for aesthetics
5. Full Post Replacement (Most Permanent)
Sometimes, you just need to start over.
Best for:
- Severe rot
- Broken posts
- Multiple failing sections
👉 See: Fence Post Installation Guide
Time to complete: 3–5 hours
Pros:
- Longest lifespan
- Clean, like-new result
Cons:
- Most labor-intensive
- Requires removing fence sections
Quick Comparison Table
| Method | Best For | Lifespan | Effort | Key Risk |
|---|---|---|---|---|
| Repair Bracket | Rot/leaning | 5–15 yrs | Low | Visible hardware |
| Reset Post | Loose soil | 5–10 yrs | Medium | Poor drainage |
| Add Concrete | Minor looseness | 3–7 yrs | Low | Moisture trapping |
| Sister Post | Weak structure | 5–10 yrs | Medium | Appearance |
| Replace Post | Severe damage | 10–20+ yrs | High | Time & labor |
Decision Guidance (Simple Way to Choose)
If you want a quick way to decide:
- Post is solid but loose → Reset it
- Post has minor rot → Use a repair bracket
- Post is badly rotted → Replace it
- Need a fast backup fix → Sister post
Don’t overcomplicate it. Match the fix to the failure.
Realistic Expectations
Here’s where people get tripped up:
- Most repairs last 5–10 years, not forever
- Drainage matters more than the method
- Cheap fixes often lead to repeat work
- One failing post usually means others will follow
If you’re fixing multiple posts, consider whether the whole fence system needs attention.
Printable Fence Post Repair Checklist

Assess the Problem:
- Is the post rotted?
- Is the issue soil movement?
- Are other posts failing?
Choose Method:
- Reinforce
- Reset
- Replace
During Repair:
- Ensure post is level
- Add gravel for drainage
- Secure post firmly
After Repair:
- Check stability after 24 hours
- Inspect after heavy rain
Product Recommendations
- Steel repair brackets (best all-around fix)
- Crushed gravel (critical for drainage)
- Fast-setting concrete (for resets)
- Post level tool
Frequently Asked Questions
What is the best fence post repair method overall?
For most situations, repair brackets offer the best balance of durability, speed, and ease.
Can I fix a fence post without digging it out?
Yes. Brackets and sister posts allow you to avoid digging entirely.
How long do fence post repairs last?
Typically 5–15 years depending on the method and soil conditions.
Is it better to repair or replace a fence post?
Repair if the post still has structural integrity. Replace if it’s rotted through.
Why do fence post repairs fail?
Usually due to poor drainage or choosing the wrong method for the problem.
Resources for More Information
- International Society of Arboriculture (ISA): https://www.isa-arbor.com
- U.S. Consumer Product Safety Commission (CPSC): https://www.cpsc.gov
- Family Handyman Fence Repair Guides: https://www.familyhandyman.com
Conclusion
The best fence post repair method isn’t about picking the “strongest” option—it’s about picking the right tool for the job. If you match the repair to the actual problem and pay attention to drainage, you’ll get years out of your fix instead of months.
And if there’s one thing to remember, it’s this:
Most fence problems start underground—so that’s where the real fix needs to happen.